
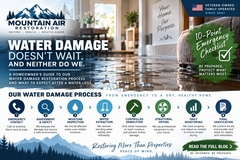
Water Damage in Your Home? Here's What to Expect in the First 24-48 Hours
A Homeowner's Guide to Emergency Water Damage Restoration
First Things First: Water Damage Gets Worse With Time
Water damage is more than wet carpet or drywall. Water quickly migrates into building materials, insulation, flooring, and hidden cavities. Rapid response helps minimize damage and restoration costs.
Step 1: Emergency Contact & Initial Assessment
We gather information about the source, affected areas, timing of the loss, safety concerns, and insurance details before dispatching a technician.
Step 2: Safety Comes First
We evaluate electrical hazards, structural concerns, and contamination risks before mitigation begins.
Step 3: Thorough Moisture Inspection
Using moisture meters, thermal imaging, and other specialized tools, we identify hidden moisture that may not be visible.
Step 4: Water Extraction
Standing water is removed using professional extraction equipment to reduce secondary damage.
Step 5: Controlled Demolition
When necessary, damaged materials are selectively removed to access trapped moisture and support drying.
Step 6: Structural Drying
Commercial air movers, dehumidifiers, and specialty drying equipment are used to restore acceptable moisture levels.
Step 7: Daily Monitoring
Technicians monitor and document drying progress, adjusting equipment as needed.
Step 8: Final Verification & Restoration Planning
A final moisture inspection confirms drying goals have been achieved and identifies any necessary repairs.
10-Point Emergency Water Damage Checklist
1. Stop the water source if it can be done safely.
2. Protect your family from hazards.
3. Turn off utilities if necessary.
4. Document damage with photos and video.
5. Contact your insurance carrier.
6. Call a professional restoration company.
7. Move valuables to a dry area.
8. Avoid using household fans without guidance.
9. Do not assume materials are dry because surfaces look dry.
10. Ask questions about the drying plan, timeline, and documentation.